User Guide(VIII): Mastering Animation Dynamics: A Guide to Retargeting with Blender - Make AI Dance
Introduction
Congratulations on mastering rigging in our previous guide! Now, let's focus on retargeting your models, using a vibrant dance example as our focal point. But first things first – where do you get animated 3D models? As mentioned before, Mixamo provides a vast library of animations, offering a great starting point. However, there's another exciting avenue to explore: Mootion. This innovative platform enables you to generate fresh motions directly within the Discord channel, adding a dynamic layer to your animation toolkit. To kick things off, we have a tutorial video showcasing the creation of a roundhouse kick motion, providing a hands-on guide for this energetic and intricate process. So, let's step into the realm of retargeting and bring your animations to life in a whole new way!
How to Get Animated 3D Models?
Mootion (via Discord server)
- First, join the official Discord server by clicking the link in the top right corner of the Mootion website, then navigate to the 'creation' channel.
- Type '/' and select '/motion'. You'll need to input three values.
- Enter your prompt, for example, "Leap, 360-degree flip, roundhouse kick."
- Choose a character model. This isn't crucial; I usually go with 'bot'.
- Choose between True/False for Inplace, which affects the character's position. 'True' keeps the animation fixed in one spot, while 'False' allows the character to move according to the original animation.
- Once generated, decide whether you like motion 1 or 2. If you prefer 1, click on M1(fbx); for 2, click on M2(fbx).
Motion Capture: MOVE AI
If you're interested in capturing your own dance movements, you can download Move AI from the iPhone's App Store at https://www.move.ai/. Move AI offers two versions: Move One, which allows motion capture using just a single smartphone, and Multi-Cam, which requires multiple camera angles for more complex captures. Currently, Move One is not yet available in the App Store for some regions.

On the other hand, if you prefer to obtain FBX files by uploading videos, you can use Plask AI or Rokoko for motion capture extraction. Click on the blue hyperlinks to visit their official websites.
To Retarget Models in Blender in 7 Steps:
After downloading your FBX file, in Blender, go to the top left corner and click File -> Import -> .fbx. Locate the corresponding file, but don't rush to click 'Import' just yet. You need to expand the 'Armature' tab in the right-side panel and check the 'Automatic Bone Orientation' option. Then click 'Import'.

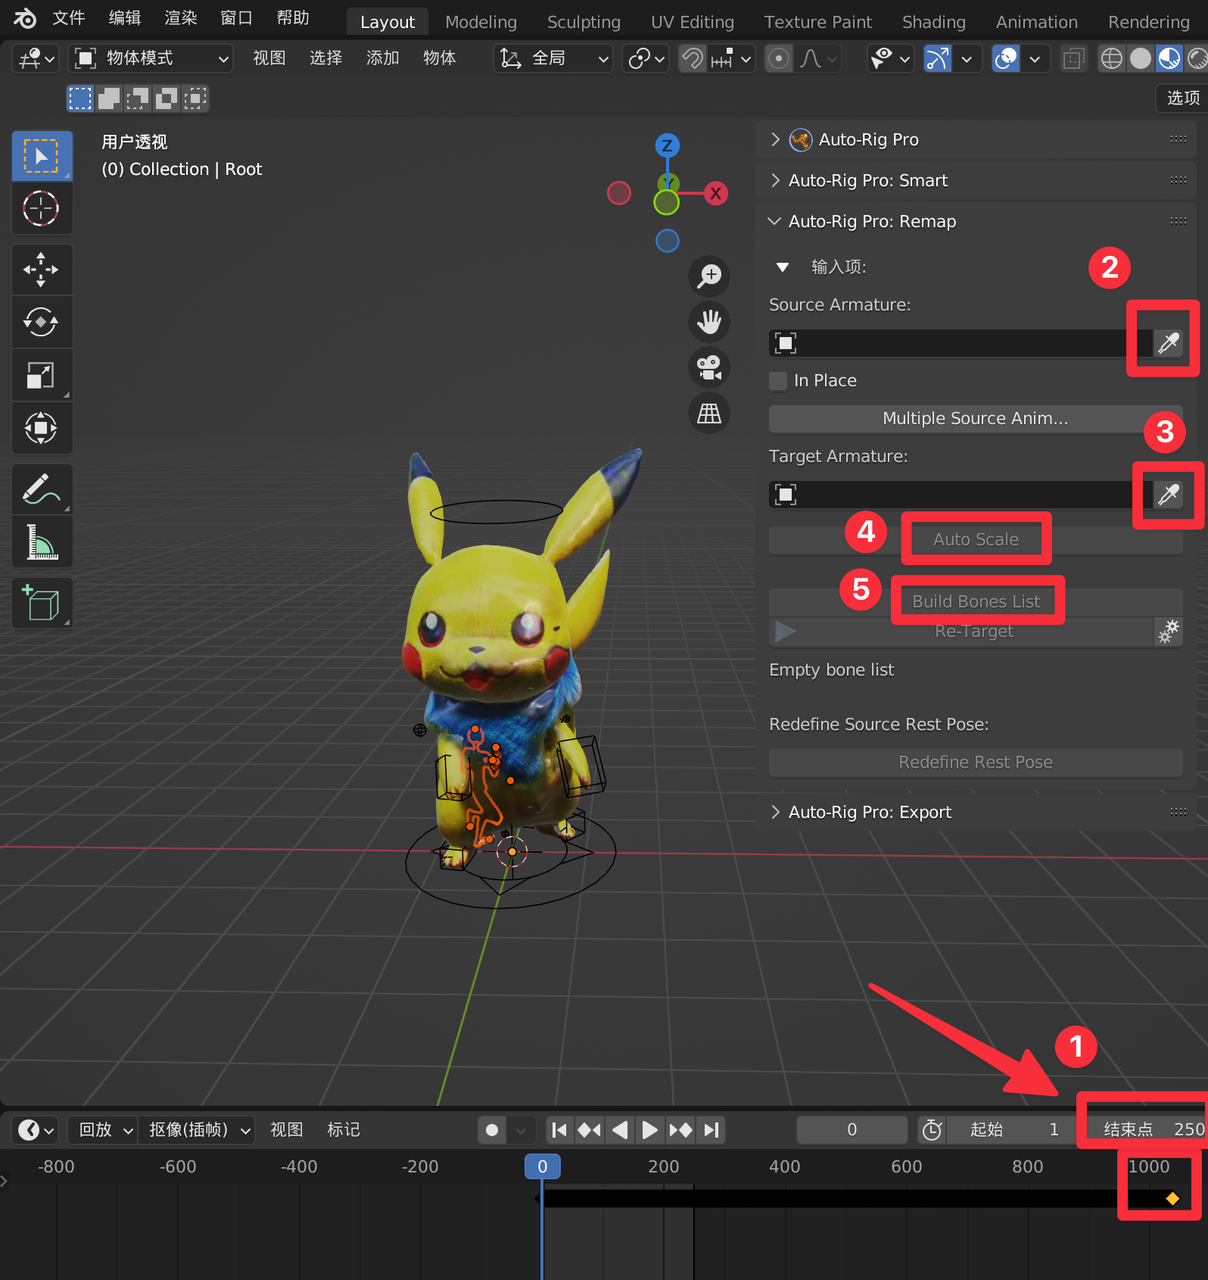
To properly import and adjust an FBX file in Blender, especially for an animation like a dance sequence, follow these steps shown in the image:
- Step 1: The end point of the frame sequence is around 1030, so adjust the value accordingly. Otherwise, the dance animation might end halfway.
- Step 2: After importing the FBX file, the Source Armature (the model outlined in yellow in the image) is selected by default. Click on the eyedropper tool. Also, in the right-side panel under "Object Data Properties," check "In Front" to easily see the FBX motion dummy model. (We've covered this before.)
- Step 3: Click on the control rig above the Pikachu model, not on Pikachu itself, and then click the eyedropper tool.
- Step 4: Click on Auto Scale to automatically match the size of the FBX dummy model to Pikachu.

Common Mistake:
Some users encounter a Python error window when clicking Auto Scale after selecting Source and Target. Why does this happen? It's likely because the source wasn't selected correctly. Let's take a motion generated by Mootion as an example. The motion model actually consists of three parts:
- The character model (e.g., the 'bot' or 'girl' in Mootion).
- Blender will automatically select everything. You can move it aside and deselect all. Then select the character and delete it using the shortcut key 'X'. What remains are two parts: one looks like a 'connector,' and the other resembles a 'large sphere.'
- You actually need to select these 'connectors.'
Here's an explanatory video 👇:
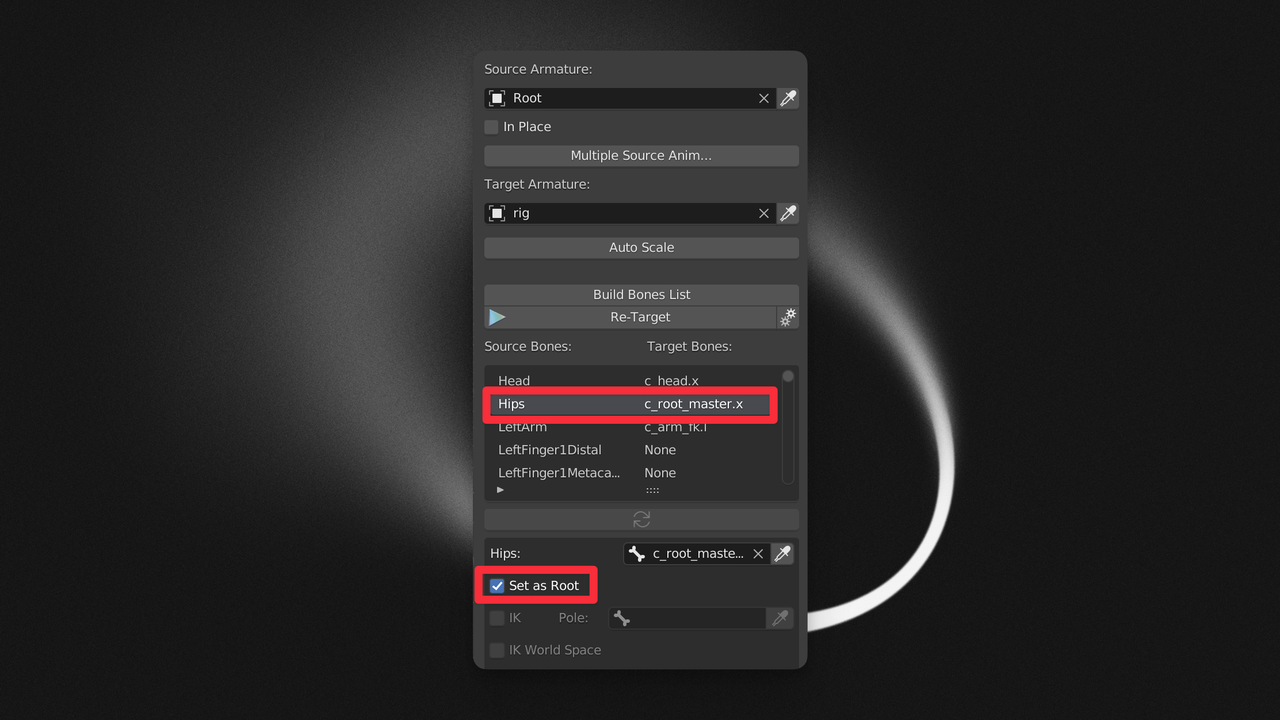
- Step 5: Click on "Build Bones List." In the list that appears, select "Hips," and then check the option "Set as Root."

- Step 6: Scroll down to find "Redefine Rest Pose." Select "Rest Pose," click confirm, then hold Shift and box-select the parts of the FBX dummy that are in a different pose from your model. Next, click "Copy Selected Bones." Wait a few seconds, and the pose of the FBX dummy will align with your model -> click "Apply." If both your model and the FBX are in standard poses, like a T-pose, from the start, then select "Current Pose" and click "Apply."
If the starting poses of your model and the FBX are different, "Redefine Rest Pose" helps to align them, ensuring that the animation is applied correctly.
Here's a demonstration video:
- Step 7: Scroll up to find the "Re-Target" button and click it. After a short wait, the motion will be automatically retargeted to your model. You can press the spacebar to play and review the effect. At this point, you can also select the model in the FBX, and delete it using the shortcut key 'X'. If you need to scale Pikachu later, remember to select both Pikachu and the control rig above its head, then press 'S' and move the mouse to scale. If you forget to select the control rig, you might encounter unexpected deformations and distortions.
Great! Now it's time to bring together the knowledge you've gained about HDR scene setup. Here is a reference demonstration I made earlier of a Snorlax dancing, which can serve as a learning example for you.
To Bind Multiple FBX Files to One Model:
To bind multiple FBX animations into a single model in Blender, you can use Blender's Non-Linear Animation (NLA) feature. Here's how to do it:
- Go to the lower panel on the left side, click on "Editor Type," and select "Non-Linear Animation."
- Find your model's keyframe track and click the "Push Down Action" button.
- Continue by importing a new FBX file.
- Switch to the Source Armature of the newly imported FBX and use the eyedropper tool to select it.
- Scroll down to "Redefine Rest Pose."
- Click the "Re-Target" button above to complete the remapping.
- Go back to the Non-Linear Animation panel, find the new keyframe track for your model, and again click "Push Down Action."
- By default, the animation on the upper layer replaces the one below. This is why you can only see the top action. Now, drag one track onto the other with your mouse.
- Move the two actions close together but keep some distance. Select both, then press Shift + T to add a transition animation.
Common mistake:
Not selecting the correct model when pushing down the action block, accidentally selecting the imported FBX model instead. This prevents merging the two tracks into one in step 8.
Here's a demonstration video tailored for using the Mootion motion generation tool:
Explore Tripo AI and join us on our media platforms:
- Official Website: https://www.tripo3d.ai
- Twitter: https://twitter.com/tripoai
- Medium: https://medium.com/@thegodtripo
- Discord: https://discord.gg/chrV6rjAfY
Original Article: https://medium.com/@thegodtripo/ultimate-tripo-ai-guide-viii-remapping-to-make-ai-dance-b903906847c3
Written by Lyson(Twitter@lyson_ober) and edited by Oliver
Advancing 3D generation to new heights
moving at the speed of creativity, achieving the depths of imagination.

